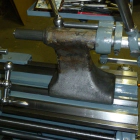
The tailstock Some time ago I bought an old series Boley Leinen lever tailstock to be fitted to my lathe. This is the tailstock:
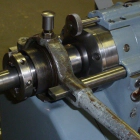
It is of the old type because it uses a split casting to lock the barrel as you can see in the picture. Leinen buid two flavors of this tailstock: one with a barrel that takes 363E collets (the 25mm collets) and other that takes the 323E collets (15mm collets).